The Multiplayer Group - Concept Art Brief
Introduction: Create a stylised 3D environment from concept art
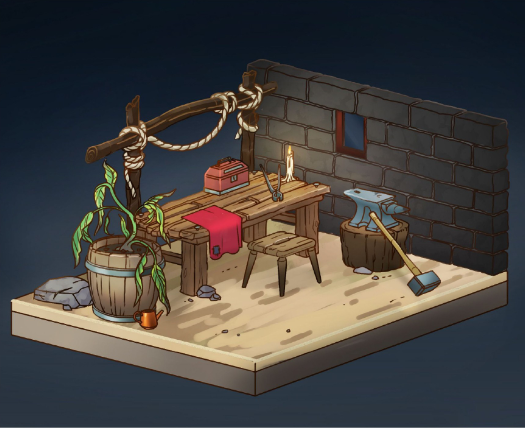
Greetings, I am Jameson a 3D artist and I was asked by Multiplayer Player Group to make this environment within 3.5k polys. Here is my process of translating concept art into a 3D game asset and the full process of hand painting textures to achieve a stylised finished result. Additionally, the software I used throughout this process will be Blender for the entire modelling process and then Autodesk Maya for UV unwrapping and to finish of Maxon Zbrush for my High Poly Sculpt to use for baking within Adobe Substance Painter.
Concept Art:
Blocking Out:
To Begin you must start looking for shapes ranging from small to large and try to figure out what will the player see more in detail and what will they not see as much as this will dictate where the distribution of polys must be executed. In the images below you can see today's progress the biggest key objects of the scene have been placed down as a foundation to block out the overall composition to help better visualise an area of focus for the players eye and also what objects need detail in their high poly to help make up for the reduction in geometry. During my process I like to use Lambert colours to help visualise the objects within the Diorama I can get a feel for the big shoes and the small ones. This is helpful for when UV unwrapping my scene as I need to set my Texel Density the same resolution so everything is scaled correctly. Furthermore, it just helps to see the larger image and correct placement & proportions if they don't line up to the concept.
Applying Texture sets:
I used 4 texture maps for this Diorama colour coded Red, Blue, Green & Orange this was to help give everything the space it needs without overlapping UV's. Furthermore, I sorted these maps by the size of objects previously mentioned (Environment, Big shapes, Small shapes and the plant as that needs its own texture map to get the best quality.
Typically, You would apply IDs to each of these assets to help with texturing but I did not in this circumstance.
For the UVs I used 0.1 padding between shells and then a value of 5 for the tile padding this allows for no shells to poke out of the UV box. The unwrapping was relatively simple with most of the scene consisting of cylindrical & cubic ancestors this meant the same rules applied for these shapes.
Texture Set 01 - Small Objects
UV - Environment Map

Texturing & Baking:
Once, everything is unwrapped the diorama is all prepared for texturing the first step was to use Maxon Zbrush to make high poly sculpts to use for baking RGB values called a normal map. This process essentially allows me to add carved gaps and chips into wood & rock without adding it to the low poly mesh which would increase my poly count to far past the required limit of 3.5K polys.
Once, everything is unwrapped the diorama is all prepared for texturing the first step was to use Maxon Zbrush to make high poly sculpts to use for baking RGB values called a normal map. This process essentially allows me to add carved gaps and chips into wood & rock without adding it to the low poly mesh which would increase my poly count to far past the required limit of 3.5K polys.
Above is a high poly render to showcase how it looks before being baked on to the low poly mesh for the objects that did not require much detail I just added a very small level of noise to break up the smoothness of the mesh and add some texture. The main points of interest for the scene was the table and and the objects surrounding it as there is a lot of wooden surfaces with bumps , grooves & gashes.
Texturing:
The textures were a hybrid between smart materials and hand painted textures layered on top. throughout texturing I tried to name all my layers in order of relevance towards the top are my filters, generators to provide Ambient Occlusion and light direction to name a few. The goal was for stylisation to aim for a sweet spot where I could capture the linework of the concept but also get some detailed environments fed into it to further enhance quality.
Final Render:
Sketchfab Link: https://skfb.ly/psvSB
What would I have done different?
Upon reflection I would of baked the stones with more detail through baking instead of what I did for this diorama where its just the low poly used as the bake. Furthermore, I would learn how to bake rope correctly instead of hand painting it as that consumed to much expensive time.
Practice hand painting textures such as Rock, wood, rope, and cloth to make the fake shading more higher quality and further enhance the artistic stylisation.


Comments
Post a Comment